AstronomyMalaysia-M101

Thursday, December 29, 2022

Testing #2 on 29 Dec 2022

After more than a month of cloudy nights and non stop raining, the sky tonight is finally clear enough for me to haul out the scope in front of the house to do some more testing! 

The pier goes out first, followed by the counterweights. 

The trolley with the powerbank, eyepieces, AutoStar and accessories next.

Finally the optical tube assembly or OTA. 

Next, I aligned the axis of the mount to face exactly North, using my iPhone compass app (ensuring that it is set to true north, not magnetic north). Twenty plus years ago, before the advent of smartphones, I had to do it with a good old compass and back then I didn't know about the need to adjust and compensate for true north! 

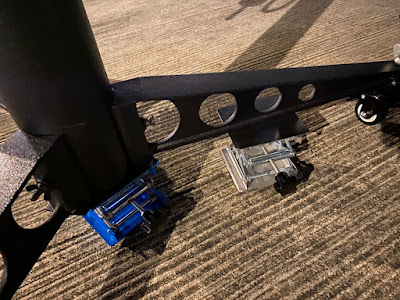
After ensuring the pier is completely level with the iPhone level app and using a mini jack to make minor adjustments, I locked the wheels of the pier and put in the counterweights. 

OTA goes on next, balance check, lock to "home position" and basic setup is ready. All done in just under 20 minutes. Not too bad if I say so myself ! 

Plugged in the powerbank and AutoStar controller, connect the controller to my laptop, power on the drive and we're in business.  
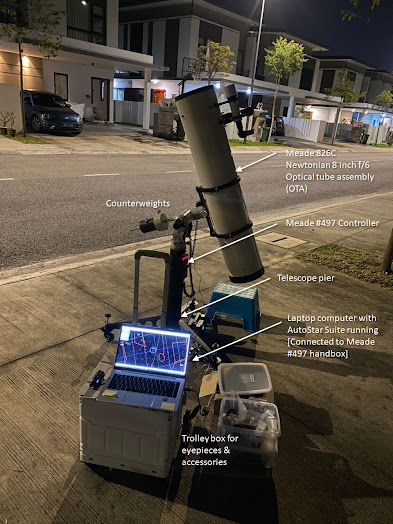
Meade 826C 8in f/6 Setup
My Meade 826C 8inch f/6 Newtonian Setup


Using mini jacks to ensure pier is completely level
Using mini jacks to ensure the pier is level

Once powered up, I did the 2 star alignment and pointed it to the gibbous Moon which was almost directly overhead. It's off by about 4 degrees. That's because I did not bother to center the stars for the alignment. Why ? Because after so many years, I've forgotten how to do it ! Need to read up the manuals again to re-learn it. 

I centered the moon on the finder scope and peered thru the 40mm eyepiece at the main focuser to center it using the the #497, then go back to make minor adjustments to center the finder scope. 

Tested the recently acquired 6mm, 15mm, with and without the 2x Barlow, works as expected ! Saw the moon, Jupiter and its moons, The Pleiades. Tried Saturn but it was too close to the horizon and there were some cloud covers.   

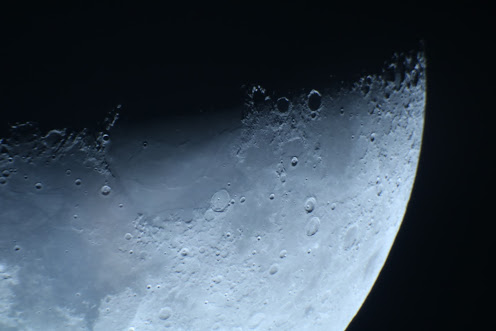
Next, I inserted the 2x Barlow and then plug in my Canon 750D DSLR and took this : 

Moon - Canon 750D with 2x Barlow on 8in f/6 scope
Moon - taken with a Canon 750D with 2x Barlow

Not too bad for a first ever attempt using a digital SLR camera ! The is without any adjustments all. With further fine tuning, I believe it can be a lot better. 

The last time I tried to take a photo on the Moon was with a Canon film camera! 

More to come ! 

Thursday, December 22, 2022

Wheels II - The Sequel

I have added a set of wheel for the telescope pier abou 2 weeks back. Now I realised that they need to be secured to ensure that the polar alignment stays in place when I do the setup. So there has to be a locking mechanism. So I went online and looked for an M12 screw type castor and luckily I found them. 


This is the new set of wheels. The main difference is that it has a metallic flap that you can push down to lock the wheels and prevent it from moving. 

Monday, December 19, 2022

Star test after 17 years

9:00pm Saturday 17 Dec 2022 - some parts of the sky was clear and Jupiter and Mars was visible. The Moon only rises at about 3:00am. December has been a difficult month, it's the monsoon season and it's been raining with overcast everyday for the past month. 

Finally there is some break in the clouds and it's time to star test the telescope after being dormant for close to 17 years! 

Moved all the equipment out to the front on the house and hope to take aim at some brighter object to do so testing. Managed to set this all up in about 25 minutes, without 2 or 3 star alignment since the Meade Autostar handbox LCD screen is not working and not displaying anything at all. 

Managed to get a glimpse of Jupiter with a 30mm Plossl at 40x. Looks great, the image was crisp and clear, testament to Meade's great optics that still works after 37 years. 

First night testing the old Meade 826C 

Next was Mars, and used 15mm Celestron Luminous eyepiece at 80x, looks great. But the clouds rolled in again and visibility was reduced. 

I've been using the handbox to slew the telescope at different speeds. Glad to confirm that all other functions of the #497 still works very well. Can't wait to get the LCD screen fixed! 

Yes, I can still use my laptop computer to point and click to slew the scope but I didn't want to haul everything out at this time.

As for the new FlashFish 48,000mAh power bank, it's well worth the investment. After about 1 hour of slewing around, the status still at full bar. Not too bad. 


FlashFish power bank with 12V DC output

By then it was about 10:00pm and with no much else visible, I've decided to call it a night. 

Not too bad. Taking it one step at a time. 

More testing to come! Especially for the Meade Autostar 497 handbox and tracking system.

I hope to take photos with my DSLR camera attached in future outings. 


Monday, December 12, 2022

Wheels

The original pier that came with the Meade 826 did not have any wheels, making it difficult to move around. Which is one of the key reason why I didn't haul it out to the nearby field to do observations as often as I would or should. 

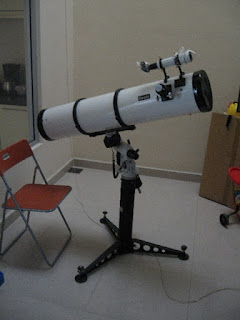
Meade 826 with its 3 legs without wheels

So this time around, my focus is to find ways to make it easier to transport and setup the telescope. Having a good set of wheels for the piece will go a long way. 

I stumbled across the furniture moving castors / wheels at Ace Hardware while shopping last week. The concave area inside the 3 wheels looks ideal for the round leg of the pier. So I decided to get a few of them. Much to my delight, it fits perfectly ! The original screw jack can also go thru the center hole and can be locked into position.

Castor / wheels for telescope pier


M12 size screw and bolt

Here's how it looks now :

Meade 826 on wheels


Saturday, December 10, 2022

I am back, after close to 12 years since my last blog post

 My last posting was on 25 Jan 2010. 

That was close to 12 years ago. Time flies. I was busy pursuing my career, at that time I just took on a new job role in a large conglomerate as the head of IT department. 

Fast forward 12 years, I have finally found the time to restart for my very first hobby which got me started on this journey like 41 years ago. 

But first thing first - my 8 inch Newtonian telescope has been in cold storage and it's time to take it out and do a thorough check on it and see whether it can still be used. 

I will update the status of the assessment and my plan to restore this beautiful piece of equipment which will take me on another journey across the universe !

Stay tuned !  

P.S. The scope buggy was never built. 

Monday, January 25, 2010

Scope Buggy

The biggest pain about having a large telescope is hauling it outdoors to do your viewing.

So now I am considering building my very own scope buggy i.e. a platform with wheels to that I can easily push it out to the lawn and start viewing almost immediately.

My usual set up time can take up to 30 minutes and I do hope to reduce that by half.

Sunday, July 1, 2007

Busy busy busy

I have not made any postings for almost 2 months now. My work has really taken up a lot of my time, reaching home between 7:00pm to 8:00pm daily, feeling tired on top of that. So no late night observations for me despite a couple of invitations sent out by Tommy.

Anyway the secondary mirror on my Newtonian is out of alignment. I have done some alignment manually but have not the opportunity to do the star test. Guess it will be some time before I can start observing again.

Sunday, May 6, 2007

Star Atlas II

I was at Border's in Berjaya Times Sqaure last year. While browsing the astronomy section, I came across the ultimate star atlas. I have seen it on the Astronomy managzine a thousand times, secretly wishing I can own one of it. It was describes as the only atlas that you will ever need - the Sky Atlas 2000.0 Deluxe Edition! This atlas contains 26 super size charts (double A3 size) covering the whole sky and showing 81,312 single, multiple, and variable stars of magnitude 8.5 and brighter and 2,700 deep-sky objects


It was going for RM210 and there are only 2 copies left. After thinking about it for 2 seconds, I decided to buy it, with my credit card and figure a way to pay for it later. This is too rare an opportunity to miss.


It's definately much much better than my 20 year old, black and white atlas. Here's snapshot of Orion - it's double the size!


Saturday, March 24, 2007

Star Atlas

Hey there, sorry for the very long silence. I have been very busy at work, trying to deliver and close a project with near impossible deadlines. Anyway, the main phase of project is almost done and now I have some room to get back to where I left off.

So back to the topic - Maps has always fascinated me. It’s a bird’s eye view of things and it gives me a sense of where I am and where I am heading. I had the map of the world on my room wall ever since I was 12 years old. My brother and I used to memorize names of cities and weird islands - like Disco Island off the coast of Greenland. (Bet you didn’t know that!) Naturally, we didn't have any problems with our geography. Besides scrutinizing at them, I'd love drawing maps and my drawings used to be the showcase for the entire class.

By the time I was 16, I was deep into astronomy already. So naturally, a star atlas was one of the first thing I went looking for. I checked out the school library, the national library as well as the local bookstore but could not find any – you have to remember that it was the mid 1980’s! The pre-Internet era.

Then one day I “discovered” a star atlas at the British Council library. The pages and colors were beautiful. But the atlas was classified as reference material and cannot be removed from the library and I desparately need one to navigate the skies. Then I noticed that there is a photocopier that can handle A3 size paper for only 20 cents a copy, there were 14 pages so that worked out to be RM2.80. Although it was black and white but it was worth having it! So I made a copy of it and had it bound.

Twenty three years later, I still have it. Check it out.

The cover of my very first star atlas.

The first 2 pages. List of objects on the left and the map (folded) on the right.

The right page unfolded. It didn't have lines to mark the constellations, so it's a bit diffifult to read and navigate.

No color? No problem, just add your own! A close up of Orion.

And of course, my journey did not end there. It was just the beginning. More coming ...

Friday, March 9, 2007

Meade Starfinder 826 with LXD-75

Thanks for the emails and since some of you guys requested a close up of the modified pier and here it is ....
This is the side view of the mount.

The bottom, inside view of the mount.

Bottom view with the Vixen pier removed.

The tube of the pier - the smaller holes closer to the top was for the old mount. There are 3 new holes drilled for the new mount.